Friday, November 16, 2012

Slow Cooking Mashed Potatoes

With Thanksgiving almost here, I thought that this would be a perfect recipe to try. Thank you FirstADream.blogspot.com!  When I saw their recipe for Mashed Potatoes in a Crockpot, I had to try it!  Anything to make Thanksgiving dinner less hectic.

I hate making mashed potatoes the traditional way.  You have to boil your potatoes in a big pot with a lot of water, make sure it doesn't boil over, and then drain off the water (and the nutrients that seeped out during cooking) without burning yourself.  If you overcook them in all that water, you might end up with a whole lot of glue.  Call me lazy, but it's just too much work for such a simple side dish.

Their recipe calls for very little water and you don't drain it off! Mash it, whip it and serve it all from the crock, if you wish. So easy!  You could use the Reynold's liners to make clean up super easy (if only cooking in the crockpot). Dump the food in the crock and cook without having to babysit it.  It's practically foolproof! 


The Recipe

Slow Cooker Mashed Potatoes


5 lbs potatoes, peeled and cubed
1 cup water or broth
1 cup butter, cut into chunks
1 tablespoon salt
¾ teaspoon ground black pepper
1 1/3 cups milk

Place the potatoes, water, and butter into a slow cooker.  Season with salt and pepper.  Cover, and cook on High for 2-3 hours, or until tender. (Large potato pieces may need more cooking time.)  Do not drain.  Mash potatoes with a masher or electric beater, adding milk and seasonings for desired texture. 

Saturday, November 3, 2012

Freezing Homemade Biscuits


First of all, I want to give full credit for this project to Favorite Freezer Foods.com for their Easy Homemade Biscuits Recipe.

The recipe is a standard, simple biscuit recipe -- nothing to write home about... or blog about... but I thought the recipe's instructions were definitely worth sharing. 

The recipe tells you how to freeze the biscuits individually before baking them, so that you can throw them in a freezer bag for storage.  Then you can have hot, fresh biscuits anytime with minimal prep, and no pressurized cans to open.

Also, the directions tell you how to prepare your dough in a food processor (my Ninja mini food processor was barely big enough for a single batch). Pushing a button to cut the shortening into the flour was so much easier, in my opinion, than cutting it in with my pastry cutter. 

Once rolled and cut, I baked half of the biscuits right away and froze the other half.  Once fully frozen, I baked them up according to the recipe's baking-without-thawing instructions.

Whether baked right away or frozen first, these biscuits came out the same (which I find very good to know).  They turned out light and fluffy, and tasted just like the small can refrigerator biscuits that you pick up for about $0.50 to $0.75 a can.  The kind of stuff best reserved for Monkey Bread (aka Cinnamon Pull Apart Bread) or Semi-homemade Donuts

I'm thrilled to know how to use my food processor to make prepping my dough easier and I'm excited to freeze ready-to-bake biscuits in the future.  Now, all I have to do is find a biscuit recipe that I love.

Thursday, October 25, 2012

Making a Chocolate - Peanut Butter - Banana Smoothie

I'm sure I had you at Chocolate and Peanut butter.  I might have lost you at Banana Smoothie. But before you go judging this one, I want to say that if done right, it is down right delicious and completely curbs my milkshake cravings.

Now, I can easily make a delicious Chocolate Peanut Butter Milkshake by combining Ice Cream, Peanut Butter, Milk and possibly chocolate syrup in the blending, but it's not a very healthy thing to eat multiple times a week.

So, I went in search of a healthier alternative, since I am making a concentrated effort to eat healthier.  Not to find the magic number on the scale, but simply to live a healthier lifestyle, so that I can teach my girls to have a healthy body image. When I step on the scale every morning, they copy me and want to see how much they weigh, just like Mommy. To me, nothing is sadder than seeing a toddler on a bathroom scale.

I was very skeptical of using frozen bananas to replace ice cream. I usually only eat the occasional banana, but once again, Pinterest convinced me to give frozen bananas a try.

Chiquita Bananas has a great website where you can look up recipes based on banana ripeness levels using their Banana Ripeness to Recipe Tool. (Check it out, it's pretty cool!) I based my recipe on their Best Creamy Peanut Butter Chiquita Banana Smoothie Recipe.

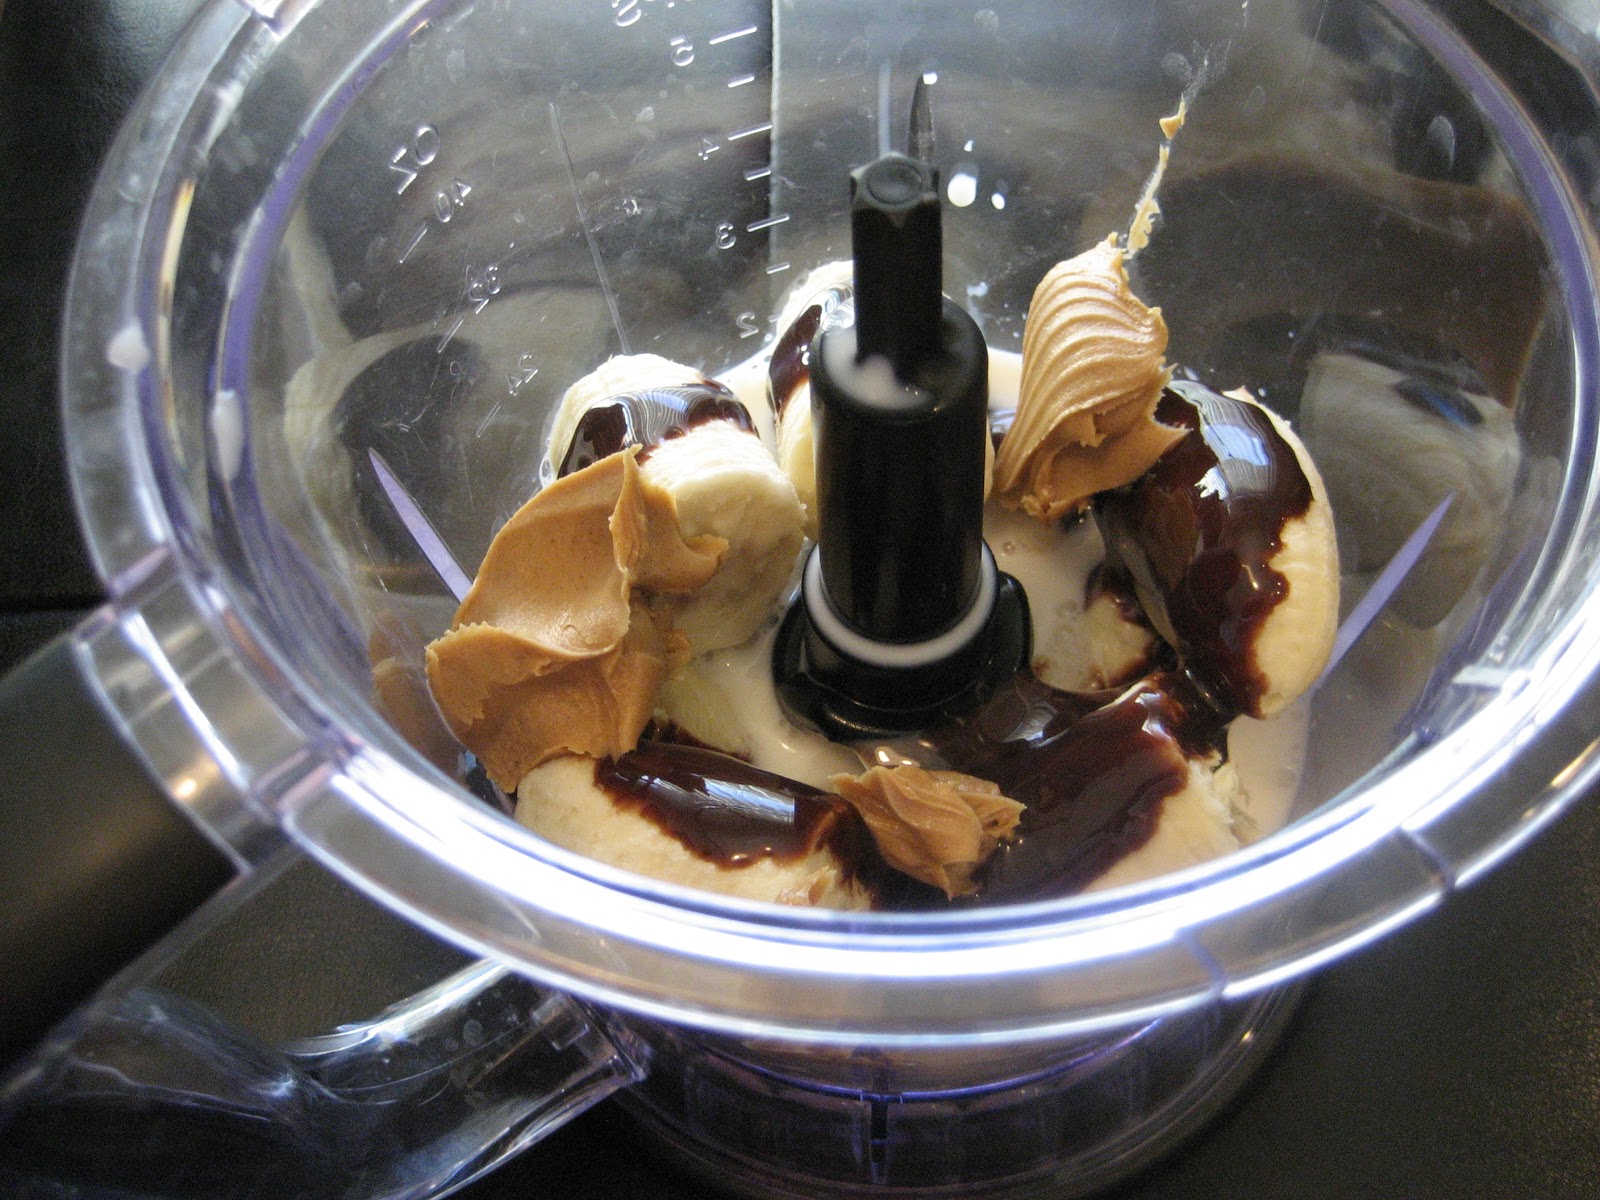
My recipe calls for blending frozen banana, milk, peanut butter and chocolate milk flavoring. The result is a deceptively Milkshake-like smoothie.


Recommendations:

Expect to still taste the banana.  You will mask it in chocolate, peanut butter goodness, but it will still be there.  Don't set yourself up for disappointment thinking it will be completely gone, because it won't.

For the thickest smoothie/shake, use banana that has been frozen solid. The softer the banana, the thinner the smoothie/shake.

If your banana is too green to eat by its self, then it is too green for a smoothie/shake. As bananas ripen, their starch turns to sugar, making it taste better and easier for your body to digest. I haven't tried using overripe bananas for this smoothie/shake, so I don't know how good it would be. If I have a banana at the perfect stage for eating, I freeze that for my smoothies.

You can throw a whole banana in the freezer, peel and all. The peel will come off easy if you slice the banana in chunks right before use in a smoothie.  However, Chiquita recommends you peel and slice your bananas before freezing. Either way works for me.

If you have a food processor, use it! I think the milkshake illusion is better completed when made with a food processor. Most kitchen blenders don't have the processing power to thoroughly puree the frozen banana to a perfectly smooth texture. That being said, I have make larger batches in my blender, and I just had some tiny banana pieces in my smoothie.

I have used both Hershey's chocolate syrup and Nesquik chocolate milk flavoring powder to make these smoothies/shakes. I like them both. Per serving, Nesquik powder has fewer calories than Hershey's syrup, for those of you who are calorie counting.

The Recipe:


1 banana, sliced and frozen
1/2 c milk
2 tsp peanut butter
2 tbsp chocolate milk flavoring

Place all ingredients in a food processor or blender.  Blend until well combined and smooth. Enjoy!

Select Nutrition Facts (based on 2% milk, Nesquik Chocolate Milk Mix, and Skippy Smooth PB):  Calories 290, Total Fat 8.5g, Cholesterol 10mg, Sodium 140mg, Total Carbs 50g, Dietary Fiber 4g, Sugars 35g, Protein 8g

Monday, October 22, 2012

Baking Low-Fat Brownies with Zucchini, Applesauce AND Banana?

I found a great pin on Pinterest for 10 New Uses for Zucchini, which included a picture of  delicious looking brownies and a link to a low-fat brownie recipe on Spark Recipes (Low Fat Zucchini Brownies).  I was excited to try making brownies from scratch using zucchini, applesauce and banana, with no eggs or oil. 
I even read a lot of the comments on the recipe, which really got my hopes up, because this recipe was supposed to make amazing brownies.  With 20 reviews, this recipe has 4.2 stars! 

I was a little skeptical when I was pouring the batter into the pan... the banana aroma was standing out a little more than I expected... and I only used 1 banana, instead of the two the recipe called for... but I was still very optimistic!  Some healthy brownies sounded really good to a Momma still working off some baby weight.

When they came out of the oven, they looked pretty good for homemade brownies.  Of course, they looked nothing like the picture on the "10 New Uses..." page, but I still couldn't wait to try them!!!

When I cut out a big piece from the middle to try it, I thought it looks sooo good!  I sink my teeth into this beautiful, homemade creation, so excited for some hot, fresh, chocolate-y goodness... and I can't even bring myself to swallow the bite... it tastes THAT bad.  I'm thinking... no, that can't be right... this recipe had 4.2 stars and all those rave reviews... I made those muffins using pumpkin, I have a killer zucchini bread recipe, I've substituted oil with applesauce before... no, these have to taste good... maybe I had a conflicting flavor in my mouth from eating something else...

So, I try them again... yeah, I couldn't swallow that bite either.  They were just so sour! And kinda bitter!  It tasted like someone snuck sour cream into my batter when I wasn't looking... lots of it!  A little banana flavor popped through the chocolate flavor, which was kind of an off flavor in a brownie.  And, I'm guessing that there wasn't enough sugar in these "low-fat brownies" to compensate for the bitter cocoa powder.  I don't know.  All I know is that I was so disappointed.  When I'm in the kitchen, the mothering side of me comes out and I want to be so proud of anything I make, just like I want to be so proud of anything my children do, that I have a tendency to be extra-fond of food that I make, simply because I made it.  Plus, they looked so good in the pan...  They HAD to taste good, right?

So, I tried them again.  Nope.  Still disappointed.  Still so unpalatable that I can't even swallow it.  At this point, these deceptive brownies are so offensive, I do something that I rarely ever do... I just throw them out.  I'd already tried them 3 times, hoping against hope that they would magically taste better with time... after all, some baked goods taste their best after completely cooling... so maybe these would?  No.  Still disappointing.  Back to the drawing board... or, rather, the Pin board.

Thursday, October 18, 2012

Cooking Potato Chips in the Microwave


Is it just me, or does the idea of hot, fresh potato chips from your microwave just sound too good to be true? 

Growing up, my wonderful mother would occasionally make homemade chips by deep-frying them.  I don't have a deep-fryer, but I do have a microwave!

I hosted a Pampered Chef party earlier this year and one of the demos was potato chips made using their Microwave Chip Maker, these handy silicone plates with holes in them.  It got me wondering... do I really need a pair of fancy plates? Would a regular ol' Corelle plate do the trick?

After a Google search, some YouTube videos and some Pinterest exploring, I became pretty confident that I could give this a try without needing to spend $25ish for a special tool.  I just needed a microwave safe plate, a potato, peeling/cutting tools, cooking spray and some salt.

I played around in the kitchen with this idea and I learned quite a bit:

I figured out that homemade, microwave potato chips are kinda like microwave popcorn -- the time can vary from batch to batch.  However, all my batches cooked between 2:15 and 3:00 minutes. 
If I used a microwave safe plate and I didn't use cooking spray, then the potato starch acted like glue and I had to soak my plate to get the potato slices off.  I recommend that you SPRAY GENEROUSLY.  Just trust me on this one.

When I used very little cooking spray on the plate and just placed the potato slices on the plate to let the slices cook in its own moisture, then the chips reminded me of Pringles.  If I gave the potato slices a coating of Canola oil (either in a bowl before putting them on the plate, or by spraying them with my Canola oil cooking spray while on the plate), then my chips reminded me more of Lays.

Arrange the potato slices in a single layer.  This helps them cook evenly.

Salting the chips before going in the microwave made for a more uniform salt flavor than salting after cooking.

Cook them until they are crisp... they aren't very good if undercooked.

If I undercooked my chips, I could just throw them back in the microwave and cook them longer and they worked just fine.  I found this out because my microwave decided to stop working on me for about 5 minutes or so (which it does when overworked...) and so I had to wait to finish cooking a batch.

I tried a couple different thicknesses for slicing my potato.  I think that thinner is better with these. I have a Pampered Chef "Simple Slicer" that I used for the slicing and preferred the "1" setting.  A YouTube video I watched used a vegetable peeler to slice their potato, and I believe that got a very similar thickness.

Don't feel limited to just salt either.  I have a McCormick Barbeque seasoning that I like on pork chops, so I decided to give that try, and it made pretty good BBQ potato chips!

I'm not saying that these will completely replace Lays or Kettle Brand Potato Chips in my heart... but if I'm looking for a quick and easy way to get a salty carb fix... and I want a very inexpensive indulgence... I will definitely make these Microwave Potato Chips again!

The Recipe:

Microwave Potato Chips

 
1 Russet Potato
Canola Oil Cooking Spray
Salt/Seasoning to taste
 
Peel potato.  Generously spray a microwave safe plate with canola oil. Slice the peeled potato in very thin slices using a mandolin, knife, or potato peeler.  Arrange potato slices in a single layer on the oiled plate.  If desired, spray the top of the potato slices with canola oil and sprinkle with salt and/or seasoning (recommended). Microwave on high for 2 to 3 minutes, or until crisp.
 

Thursday, October 4, 2012

Baking Muffins with Canned Pumpkin


While wandering the internet, I have found a bazillion blogs and recipe sites with recipes for baking cakes using alternative ingredients to lower calories and fat content. 
 
When I found "healthy" Pumpkin Muffins made with just a can of pumpkin and a cake mix, I decided I had to try it!
 
I only have the larger 29 oz cans of pumpkin from my Costco shopping and all the recipes I found online used the smaller 15 oz. cans, so I decided to try two recipes at once and split the 29 oz can in half.  Half the can was used to make Pumpkin Muffins and the other half was used to make Chocolate Chocolate Chip Muffins.


First, the Pumpkin Muffins:

I went very simple on these – just 3 ingredients: about 15 oz of Pumpkin, 1 box of Duncan Hines Classic Yellow cake mix and 2 tsp Pumpkin Pie Spice. 
 
 
I only mixed for 1 minute, and should have gone for 2 minutes instead, because my batter was a little lumpy which made for muffins with little yellow lumps. 
 
I baked the muffins at 350 F for 20 minutes and I used the remaining batter to bake a mini loaf pan of pumpkin bread (350 F for 35 minutes).  

To be honest, I wasn’t expecting anything too spectacular… and I’ll admit, I think it would have benefited from a little extra sweetness, but overall they were pretty dang good!  I was pleasantly surprised!  Some cream cheese frosting would probably make these amazing (but would totally destroy the whole "low fat" aspect!)


Second, the Chocolate Chocolate Chip Muffins:

I used about 15 oz of Pumpkin, 1 box of Duncan Hines Dark Chocolate Fudge cake mix, ¼ cup of milk, ¼ cup of unsweetened applesauce, and ¾ cup semi-sweet chocolate chips.  I only intended to do ½ cup of chocolate chips, but accidentally grabbed the wrong measuring cup… whoops!
 
 
This time I mixed for 2 minutes and the batter was very smooth and a little fluffy. 
The dozen muffins/cupcakes needed 25 minutes at 350 F.  Once cooled, these muffins were very rich and decadant.  Honestly, I think that they probably are more like cupcakes than muffins.  If you want a chocolate-y treat and are on a diet, I totally recommend these!

My mini loaf pan of batter overflowed and started to burn, so I had to very carefully scrape the bottom of my oven while everything was baking… not fun!  After 35 minutes, I pulled the loaf out of the oven… unfortunately, it was pre-mature, but my house was getting hot and I was getting worn out so I gave up.  The loaf looks more like a canyon than a hill. 

I guess that’s what I get for being impatient.  See, patience really is a virtue… especially in baking.
 

The Recipes:


Pumpkin Muffins


1 - 15 oz can 100% Pure Pumpkin
2 tsp Pumpkin Pie Spice
1 box Yellow Cake Mix

Preheat oven to 350 F.  Mix together the pumpkin and pumpkin pie spice.  Add yellow cake mix and stir until combined.  Beat on medium speed for 2 minutes.  Scoop batter into a lined muffin pan or greased and floured bread pan.  Bake at 350 F for 20 - 25 min. for muffins or 35 - 40 min. for mini loafs.  After baking, let cool in pan for 5 - 10 minutes before transferring to a cooling rack.


Chocolate Chocolate Chip Muffins

1 - 15 oz can 100% Pure Pumpkin
1/4 cup milk
1/4 c applesauce (unsweetened)
1 box Dark Chocolate Fudge Cake Mix (or other chocolate cake mix)

Mix together the pumpkin, milk and applesauce.  Add chocolate cake mix and stir until combined.  Beat on medium speed for 2 minutes.  Scoop bater into a lined muffin pan or greased and floured mini loaf pan. Bake at 350 F for 25 - 30 min. for muffins or 35 - 45 min. for mini loafs. After baking, let cool in pan for 5 - 10 minutes before transferring to a cooling rack.
 

Acknowledgement: 

My inspiration for this project came from MANY sources, including these: